Eyegrade User Manual
| Author: | Jesús Arias Fisteus |
|---|
Contents
- 1 Installing Eyegrade
- 2 Grading Exams
- 3 Processing Student Grades
- 4 Editing exams
- 5 Advanced features
This is the user manual for Eyegrade 0.9. Versions of this manual for earlier releases are available: 0.8, 0.7, 0.6, 0.5, 0.4, 0.2.
1 Installing Eyegrade
1.1 Installation on GNU/Linux
We propose several ways to get Eyegrade running, so that you can choose the one that better fits your needs and experience in Linux systems:
- Install in binary format from a tarball file.
- Install through pipx within your user's account.
Both are described below. The first alternative is somewhat easier, since it doesn't require you to install any other software, but has the disadvantages that Eyegrade may take longer to startup or, on rare occasions, might fail to start on your Linux system. The second alternative, pipx, requires your system to have Python 3.6 or 3.7 installed. The installation procedure is a little bit more complex, but in our opinion it's totally worth it if you already have Python 3.6 or 3.7.
1.1.1 Installation in binary format from a tarball file
Eyegrade for Linux is distributed as a tarball file containing the executable files eyegrade (its main program) and eyegrade-create (the command line tool that creates the PDF files of the exam). Download and uncompress the tarball file from the downloads page and save the binary files in the location you prefer inside your account or within a system-wide directory. You may want to add the directory to your PATH or place the binaries inside a directory that is already in your PATH. For example, if you want to place the binaries inside /usr/local/bin, which is usually in your PATH:
tar xavf eyegrade-0.9-linux-bin.tgz
sudo cp eyegrade-0.9-linux-bin/eyegrade /usr/local/bin
sudo cp eyegrade-0.9-linux-bin/eyegrade-create /usr/local/bin
1.1.2 Installation through pipx within your user's account
Check that your Linux system has Python 3.6, 3.7 or 3.8 installed by running:
python3 --version
Several things may happen:
- The python3 command is not found: look for it with your package manager and check that its version is 3.6 or later. The package is called python3 in most Linux distributions.
- If reports a version number lower than 3.6: your Linux distribution does not probably package a 3.6 or later version. You may install Python 3.6 or 3.7 through pyenv.
Once you have a working version of Python 3.6 or Python 3.7, install pipx through pip:
python3 -m pip install --user pipx
If you get a message saying that there is no module named pip, install the python3-pip package and then run:
pip install --user pipx
The pipx command might now be available on your shell's PATH. Try to run:
pipx install eyegrade
If pipx isn't found as a command, you need to add $HOME/.local/bin to your PATH. The pipx program is able to do that if you run:
$HOME/.local/bin/pipx ensurepath
Now, try to install Eyegrade again, and it should work:
pipx install eyegrade
That's it! You can now run Eyegrade by entering the eyegrade command in a terminal:
eyegrade
The eyegrade-create program will also available as a command-line program:
eyegrade-create --version
1.2 Installation on Microsoft Windows
Download and install Microsoft's Visual C++ Redistributable for Visual Studio 2015.
Then, download Eyegrade's Windows installer from the downloads page and run it. Once installed, Eyegrade will be accessible through your Start Menu.
Important: The security systems of Windows will probably alert you that running the installer may be dangerous because of it coming from an untrusted source. The reason is that being Eyegrade free software I cannot pay for a trusted certificate with which to sign the installer. If you want to be sure the installer has not been tampered with by anybody, use the checksums from the downloads page.
Note: If you try to uninstall Eyegrade manually or run the installer for a newer version, the installer may fail with a message saying that Eyegrade is running and should be closed first. This message will appear also if there is any file manager window positioned in a directory called Eyegrade. Close the file manager window in that case and proceed again.
1.3 Installation on Mac OS X
Unfortunately, I cannot provide support for Mac OS X. I'm confident that Eyegrade should work on that platform out of the box or with some minimal changes, but I don't own a computer in which to check and build an installer. Volunteers to support Eyegrade on Mac OS X are welcome.
1.4 Upgrading from Eyegrade 0.8 to Eyegrade 0.9
In Linux systems, just replace the binaries of Eyegrade 0.8 with the new ones. In Windows, you can uninstall Eyegrade 0.8 using the Add/remove programs feature.
Eyegrade 0.9 is backwards-compatible with grading sessions created with Eyegrade 0.3 and later versions.
The main changes of the most recent versions are described in the following blog posts:
2 Grading Exams
If it is the first time you run Eyegrade, it is recommended to go first through the Quick start guide. From now on, it is assumed that you've already done that.
The main purpose of Eyegrade is grading exams. In order to grade exams, you will need:
- The Eyegrade software installed in your computer.
- The exam configuration file, which specifies the number of questions in the exam, solutions, etc. It is normally named with the .eye extension, such as exam.eye.
- A compatible webcam, with resolution of at least 640x480. It is better if it is able to focus (manually or automatically) at short distances.
- The list of students in your class, if you want Eyegrade to detect student IDs.
- The exams to grade.
2.1 Launching Eyegrade
If it is the first time you use Eyegrade, you can try it with the sample file exam-A.pdf located inside the directory examples of your installation of Eyegrade. Print it. You'll find also in that directory the file exam.eye that contains the metadata for this exam. You'll need to load this file later from Eyegrade.
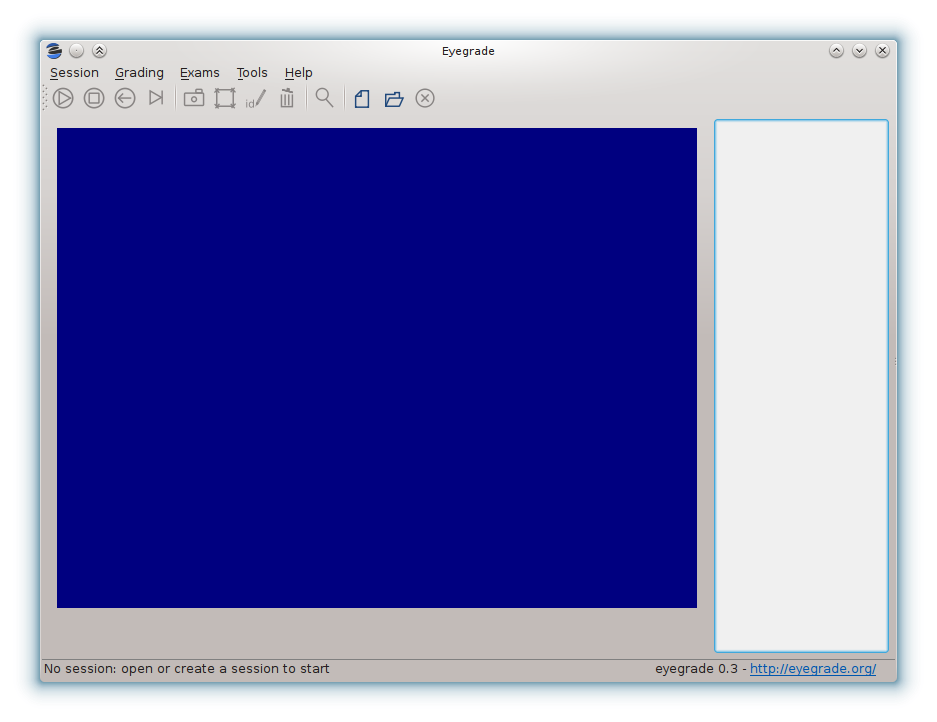
On Windows, launch Eyegrade from the Start Menu. On Linux, run the eyegrade binary file you should have installed. Eyegrade's main window should appear:
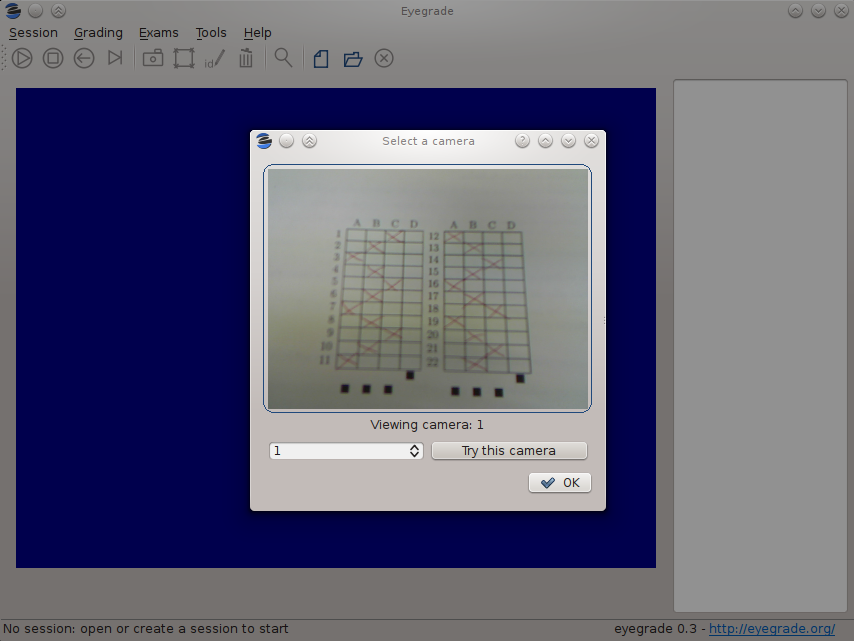
Before beginning to grade exams, especially the first time you run Eyegrade, you can check that Eyegrade can access your webcam. In the Tools menu select the Select camera entry:
The next step is creating a grading session. Select New session in the menu Session. A wizard will ask for some data Eyegrade needs for creating the session:
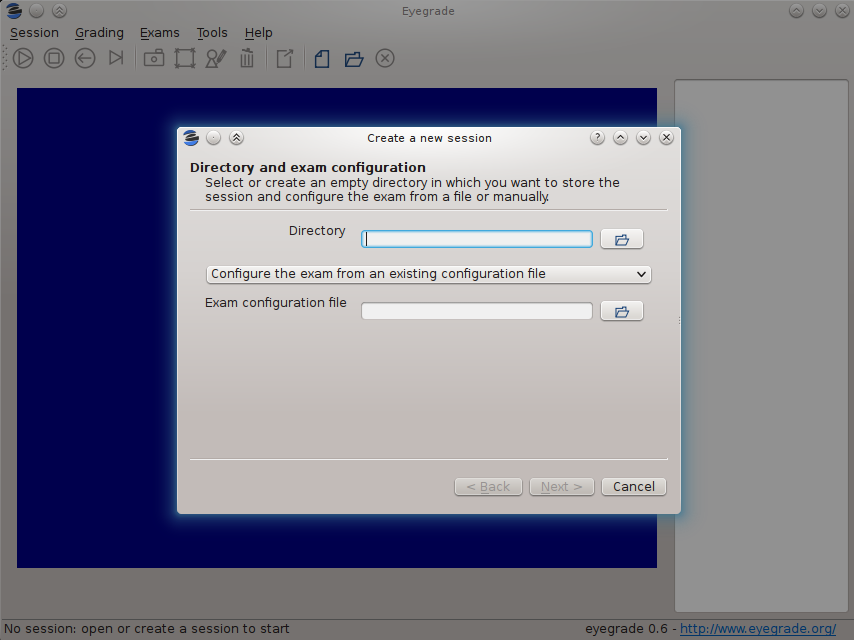
In the first step of the wizard, you must select or create the directory where Eyegrade will store the data (grades, captures of exams) for this grading session. If you select an existing directory, it must be empty. In addition, you'll choose between loading an existing exam configuration file or configuration the exam manually. The configuration of the exam consists of data such as the number of questions, the correct answers, the geometry of the answer tables, etc. If you use Eyegrade for editing the exam, as explained in Editing exams, the exam configuration file will be automatically created along with the PDF files of your exams. If you are testing the sample exam distributed with Eyegrade, you should load here the exam.eye file from the same directory.
If you edit the exam with other software such as Microsoft Word (see Creating the exams in a word processor), select the option Configure the exam manually and proceed as explained in Manual configuration of the exam.
After you have entered the exam configuration (either from a file or manually) the last two steps of the wizard will allow you to create student groups and load student lists, as well as to enter the scores awarded to questions:
- Students: you can import student lists from your file system and manage student groups. See Student lists for more information about this feature.
- Scores for correct and incorrect answers: this step is optional. If you provide the scores awarded to correct answers (and optionally deducted from incorrect answers), Eyegrade will show the marks of each exam. See Scores for more information about this feature.
After you finish with this dialog, Eyegrade opens the session. It shows the image from the webcam and starts scanning for the exam. Point the camera to the exam until the image is locked. At this point, Eyegrade should show the answers it has detected. Read the following sections for further instructions.
2.2 Manual configuration of the exam
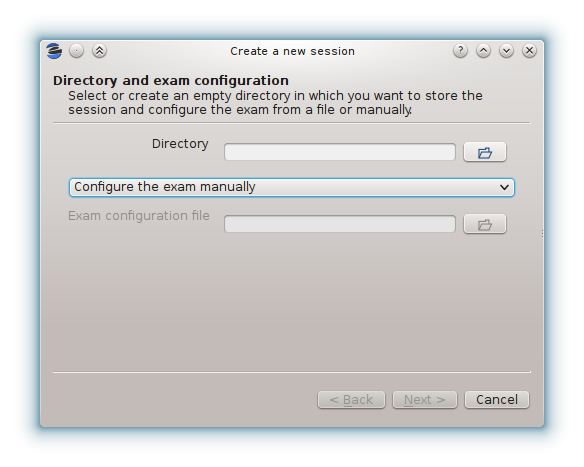
If you choose to edit your exams with a word processor instead of using the LaTeX-based system that Eyegrade provides, you'll need to enter the exam configuration manually. You can enter it when you create a new session. In the first page of the session creation wizard, choose the option Configure the exam manually:
Then, create or select an empty directory for the session and proceed to the next page:
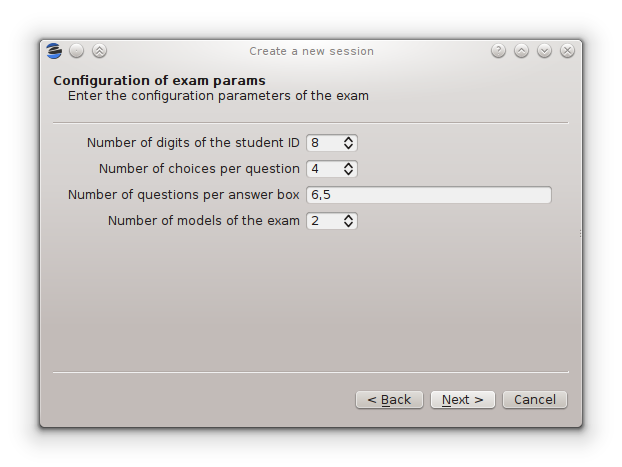
In this page, you must enter:
The number of digits of the student id number. Set it to 0 if your exams do not ask for an student id.
The number of choices per question. That is, the number of alternative answers from which the student must select one.
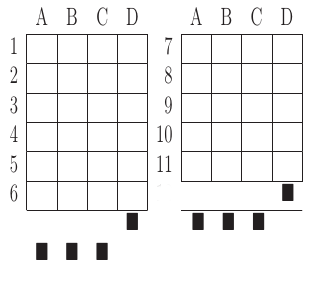
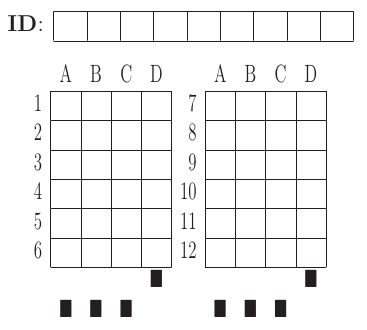
The number of questions per answer box. The answer sheet may contain more than one answer table, such as the examples shown at Creating the exams in a word processor. Enter here the number of questions per answer table, from left to right. For example, you would enter "6,5" for the following answer table:
The number of models of the exam. If you have different permutations of your questions in order to make it more difficult for students to look at the answers of other students, enter here how many variations of the exam you have. Each variation is called a model in Eyegrade. Models are labeled "A", "B", "C", etc.
Then, proceed to the next page and enter the correct answer for every question in every model of the exam:
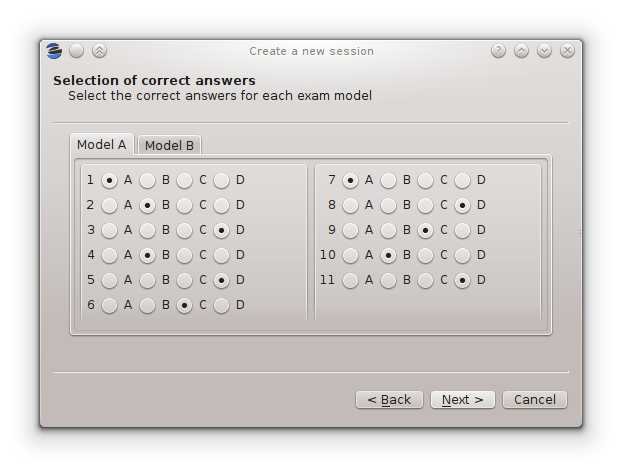
You must enter the correct answer for every question in every exam model. When you finish entering the data of this page, the wizard will proceed to ask about the student list and question scores as explained in the previous section.
If you or your collegues need to create other sessions with the same configuration as one you've already entered, use the option Tools / Export exam configuration to export a file with the exam configuration of the current session. With this file you can create new sessions with exactly the same configuration.
2.3 Student lists
The accuracy in the detection of the student identity improves dramatically when you supply the list of ids of the students in your class, where each student id is expected to be a sequence of digits.
Many institutions divide the students of the same course in separate groups or classes. Eyegrade is able to manage students in separate groups, which will allow you to export a separate grades listing for each one.
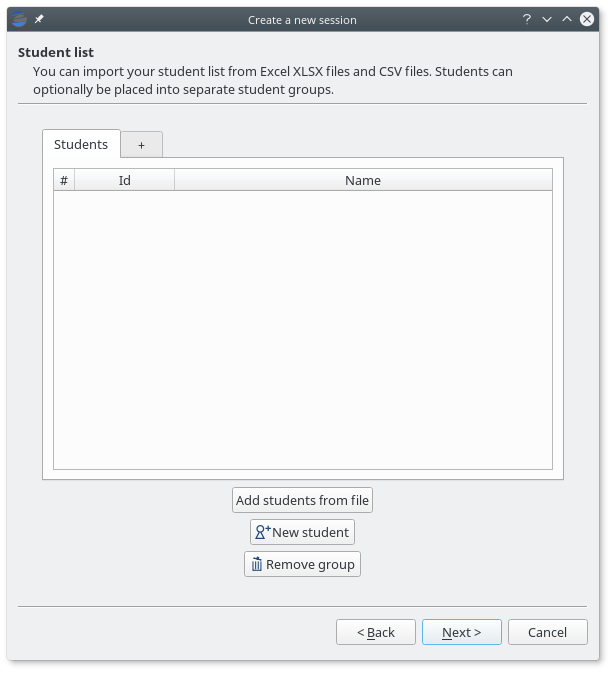
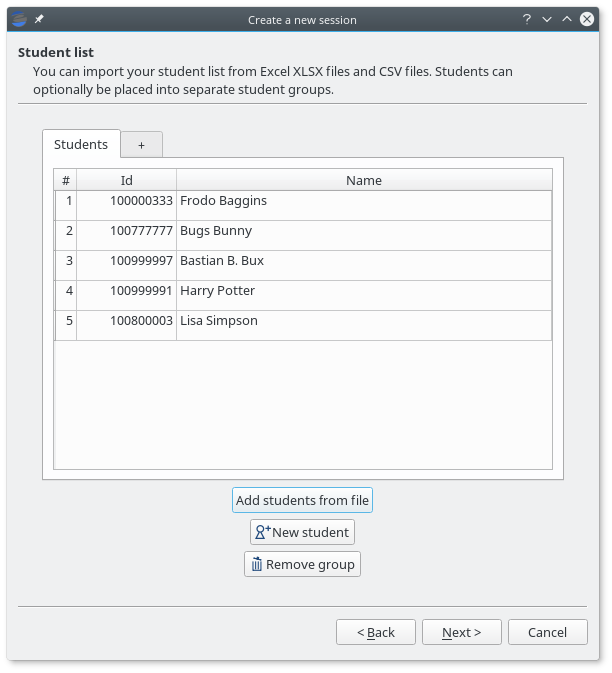
You can manage student groups and import the lists of students either in the New session wizard or later in the Exams / Students menu option. Both methods provide the same user interface. At the beginning, a default group with no student will be shown:
If you don't need to separate your students into groups, just load the file or files that contain your student lists. Student lists can be provided in Office Open XML format (.XLSX files created from Microsoft Excel, LibreOffice and other compatible spreadsheet software) or in CSV (comma-separated values) format. In both cases, Eyegrade will scan the first columns and try to detect which ones store student ids (mandatory) and, optionally, student names and email. Your files may include a header line at the beginning and empty lines. They will be ignored when detected.
Some examples of valid student lists are shown below:
Student ids: just one column with the id number of the student:
100000333
100777777
100999997
Student id and full name: one column contains the student id number and the other one their full name:
100000333    Frodo Baggins
100777777    Bugs Bunny
100999997    Bastian Bux
Column order doesn't matter:
Frodo Baggins   100000333
Bugs Bunny      100777777
Bastian Bux     100999997
Separate first and last names: you can enter first and last names in separate columns, as long as they are contiguous. The first of them is treated as the first name by default:
100000333   Frodo   Baggins
100777777   Bugs    Bunny
100999997   Bastian Bux
If your file provides them in the opposite order, you'll be able to swap them once the file is loaded:
100000333   Baggins Frodo
100777777   Bunny   Bugs
100999997   Bux     Bastian
In any of the previous combinations of columns you may also insert a column with emails, in any position except between first and last names:
100000333   Frodo Baggins   frodo@shire.com
100777777   Bugs Bunny      bugs@cartoon.com
100999997   Bastian Bux     bux@fantastica.com
Student id numbers must be composed just by digits. Leading zeros are allowed. Student first and last names can contain international (non ASCII) characters. They should be properly read from XLSX files. In CSV files you should use UTF-8 encoding.
In order to load a file, press the Add students from file button and select the file. A preview dialog will appear, in which you can revise the student list and fine tune how student names are loaded:
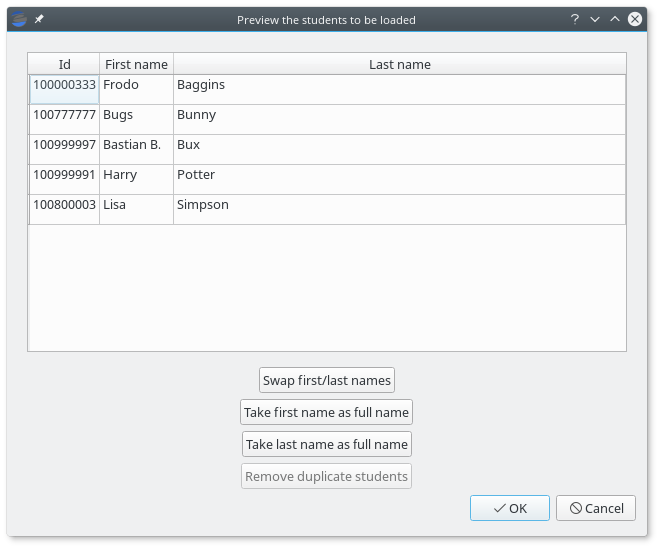
From this dialog, you'll be able to swap the first and last name columns, just in case the were provided in the wrong order or treat one of these columns as the full name, in case Eyegrade wrongly detected separate columns.
Eyegrade won't allow you to load several students with the same student id. If that happens, the affected students will be highlighted and you'll be able to remove them from here.
You can accept or cancel the preview dialog. If you accept it, the students will appear now in your student list:
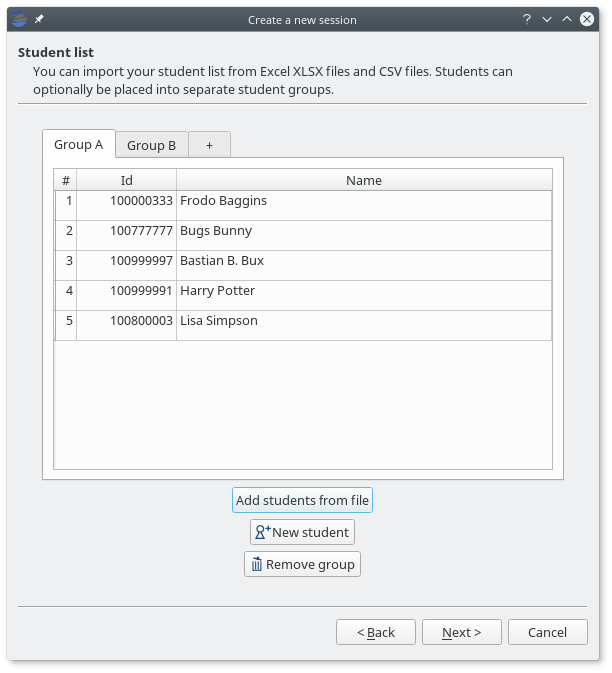
You can also create a new group by clicking on the right-most tab header, rename a group by doubly-clicking on a tab header and remove the active group by pressing the Remove group button. Groups in which at least one student has an already graded exam cannot be removed:
2.4 The session directory
A grading session in Eyegrade represents the grading of a specific exam for a group of students. For example, you would grade the exams for the final exam of all your students in the subject Computer Networks in just one session. Other exams, such as the re-sit exam of the same subject, should go in separate sessions.
Grading sessions are associated to a directory in your computer. You select or create this directory when you create a new session. Eyegrade stores there all the data belonging to the grading session (configuration file, student lists, grades, images of the already graded exams, etc.)
You can open again later an existing session with the Open session option of the Session menu. In the file selection dialog that appears, select the session.eyedb file inside the directory of the session you want to open. When you open the session, you can continue grading new exams that belong to that session.
2.5 Scores
Eyegrade can compute the scores of the exams. When you create a new session, you can select in the last page of the wizard one of the following three options:
- No scores: Eyegrade shows the number of correct and incorrect questions, but does not compute scores.
- Same score for all the questions: all the questions are awarded the same score. You must specify the score for each correct question. Optionally, if you want incorrect or blank questions to have a penalty in the score, you can also specify a (negative) score for incorrect questions and for blank questions.
- Base score plus per-question weight: in this mode, not all the questions have the same score. You must define a base score (a reference score for correct, incorrect and blank questions) and, for each question, a relative weight. The final score for a question is computed as the multiplication of its weight and the base score. This mode can also be used for voiding questions: when you assign a weight of 0 to a question, it does not contribute to the score of the exam.
2.5.1 Same score for all the questions
When you select this option, all the questions count the same in the score of the exam. Eyegrade counts the number of correct, incorrect and blank answers, and multiplies each one by the score assigned to each of those types of answers.
For example, suppose an exam with 10 questions, in which correct answers add 1 point to the score and incorrect answers subtract 1/3 points (one third of a point). A student having 7 correct and 3 incorrect answers will get 6 points (7 * 1 - 3 * 1/3).
You specify those scores in the last step of the session creation wizard:
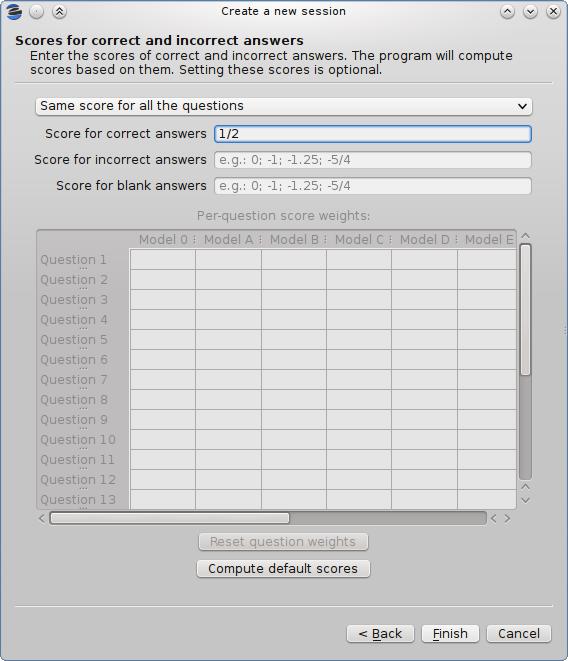
Giving a positive score for correct answers is mandatory in this mode. The score for incorrect and blank answers is optional, and defaults to 0 when you don't enter it.
Eyegrade can automatically compute the appropriate scores for you if you specify the total score that a perfect exam would achieve. In order to do that, press the Compute default scores button, and the following dialog appears:
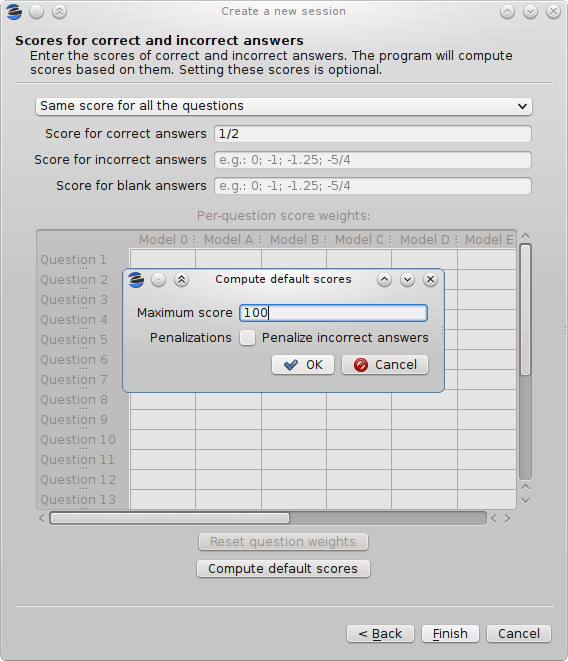
The dialog computes the score for correct answers as the total score for a perfect exam divided by the number of questions. If you select the Penalize incorrect answers option, a score for incorrect answers is also computed as the score for correct answers divided by the number of choices of each question minus one. This way, the expected score for an exam with random answers (all the questions have the same probability of being marked by the student) is zero.
2.5.2 Base score plus per-question weight
When you select this option for computing scores, not all the questions are awarded the same score. Important questions may get bigger scores than less important ones. In order to do that, you define a base score (e.g. 2 points for correct answers and -2/3 for incorrect ones) and a relative weight for each question. The weight of a question is a factor that multiplies the base score in order to get the actual score of that question. For example, for a question that you want to score double than the base score (4 points for correct answers and -4/3 for incorrect ones) you would set a weight of 2. For a question you want to have exactly the base score, you would set a weight of 1. You can even decrease the score of a question with respect to he base score. A weight of 1/2 would mean 1 point for correct answers and -1/3 for incorrect ones in our example.
You need to edit the scores in the table at the center of the dialog:
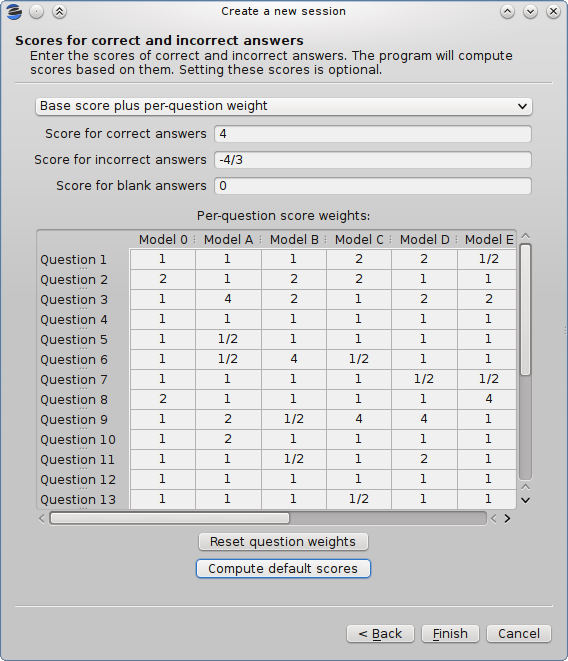
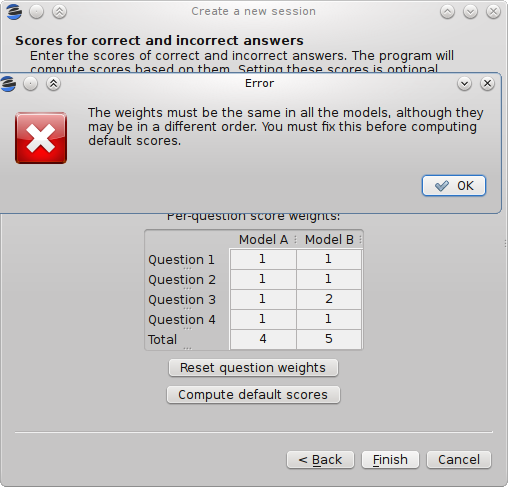
You can enter in each cell integer numbers (e.g. "2"), fractions (e.g. "1/2") or decimal numbers with fractional digits (e.g. "2.5"). If you have several exam models (alternative orderings of the questions), eyegrade will check that you enter the same weights in all the models, possibly in a different order for each model:
In addition, if your session configuration file contains the permutations done to each model (if you create the documents of your exams with Eyegrade, it will), Eyegrade automatically updates the value in all the models every time you change the weight of a question in one of them. However, if the file does not contain the permutations, you'll need to enter the weights for all the models yourself.
The Compute default scores button works also as expected in this mode. It takes into account the question weights you entered in order to compute the base scores. You should edit the question weights before computing the default base scores.
Assigning weight 0 to a question voids it:
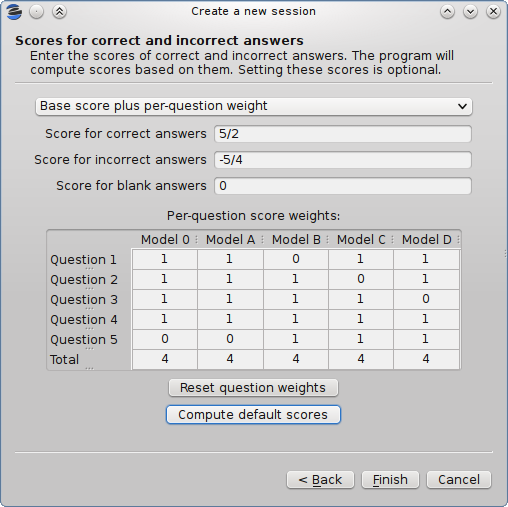
The example above voids question 5 in model A, which is also question 1 in model B, question 2 in model C and question 3 in model D. Void questions will be clearly displayed in the capture of the exam, and won't be considered either for the score or the count of correct and incorrect questions:
2.6 Application modes
At a given instant, the application is in one of these modes:
- No session mode: no session is open. You can open an existing session or create a new session.
- Session home mode: a session is open. This is the entry point for starting grading and reviewing already graded exams.
- Grading mode: the application continually scans the input from the webcam, looking for a correct detection of an exam.
- Review mode: the application shows a still capture of an exam with the result of the grading, so that the user can review it and fix answers or the student id, if necessary.
- Manual detection mode: in the rare cases in which the system is not able to detect the geometry of the exam in the grading mode, you can enter this mode and mark the corners of the answer tables. Eyegrade will be able to detect the tables once you tell it where the corners are.
The application starts with no open session. Once you open or create a session, it changes to the session home mode. From it, you can start or continue grading (enter the grading mode with the Start grading command) or review already graded exams (enter the review mode by clicking on an exam at the right side of the main window).
When you are in the grading mode, the program is continually analyzing the image of the webcam. When it detects an answer sheet that it can read, it locks the capture and enters the review mode. Once you confirm that capture (command Continue to the next exam), Eyegrade automatically goes back to the search mode in order to scan the next exam.
You can enter the manual detection mode by issuing the appropriate command while in the other modes.
From the grading mode you can go back to the session home mode with the Stop grading command. From any of the other modes, you can go back to the no session mode with the Close session command in the Session menu.
2.7 The grading mode
In the grading mode, you have to get the camera to point to the answer table of the exam, including, if present, the id box above it and the small squares at the bottom.
Eyegrade will continually scan the input of the webcam until the whole exam is correctly detected. At that moment, Eyegrade will switch to the review mode.
Sometimes, Eyegrade is able to detect the answer table but not the ID table at the top of it. You can notice that because the detected answers are temporary shown on top of the image. At this point, you may try further until the ID box is also detected, or just use the Capture the current image command of the Grading menu, which will force the system to switch to the review mode, using the most recent capture in which the answer table was detected. You will be able to manually enter the missing student id in that mode.
In rare occasions, Eyegrade could fail event to detect the answer table. The Manual detection command of the Grading menu allows you to help the system detect it.
These are the commands available in the grading mode, all of them at the Grading menu:
- Capture the current image (shortcut 's'): forces the system to enter the review mode with the the most recent capture in which Eyegrade was able to detect the answer table. If there is no such capture, the system just uses the current capture.
- Manual detection of answer tables (shortcut 'm'): the system enters the manual detection mode, in which you can help the system detect the answer table by marking the corners of the answer tables. After that, the system will detect the answers of the student and automatically enter the review mode. See The manual detection mode.
2.8 The review mode
In the review mode you can review and, if necessary, fix the information detected by Eyegrade in the current exam. You can do it on both the answers given by the student to each question and the student id. You enter the review mode in one of the following three different situations:
- With the answers of the student and her id detected. This is the usual case. Eyegrade was able to detect the whole exam, and you can review the information extracted from it.
- With the answers of the student, but without her id. This is the case when you use the Capture the current image command in the grading mode because Eyegrade detected the answer table in at least one capture, but not the student id box. In this case, you can review the answers given by the student and manually enter her id.
- With neither the answers of the student nor her id. This is the case when you use the Capture the current image command in the grading mode because Eyegrade was not able to detect anything from the exam. In this situation, you can switch to the manual detection mode to help the system to detect the answer tables, and manually enter the student id.
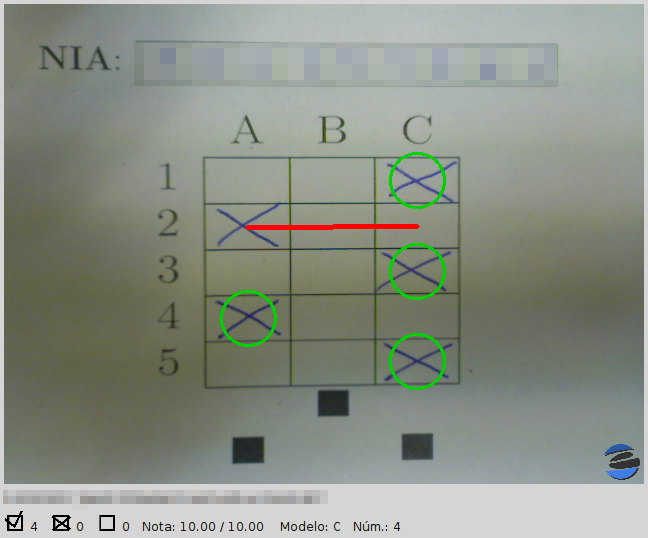
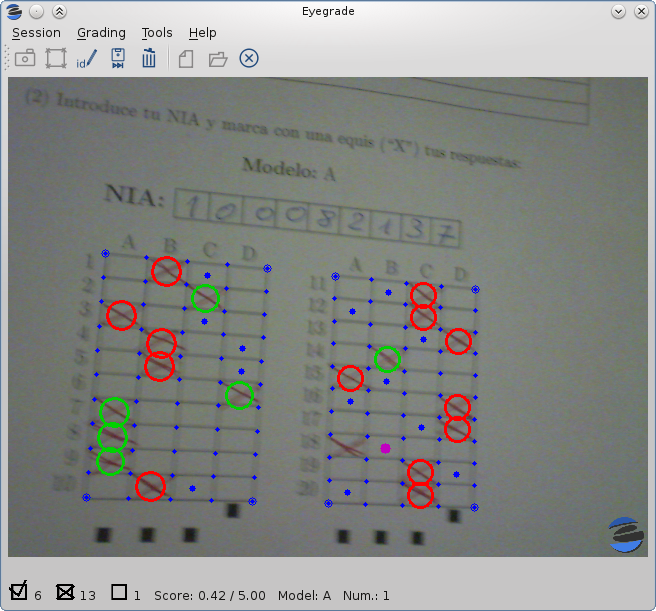
The user interface shows, in this mode, a capture of the exam augmented with the detected information, as shown in the following image:
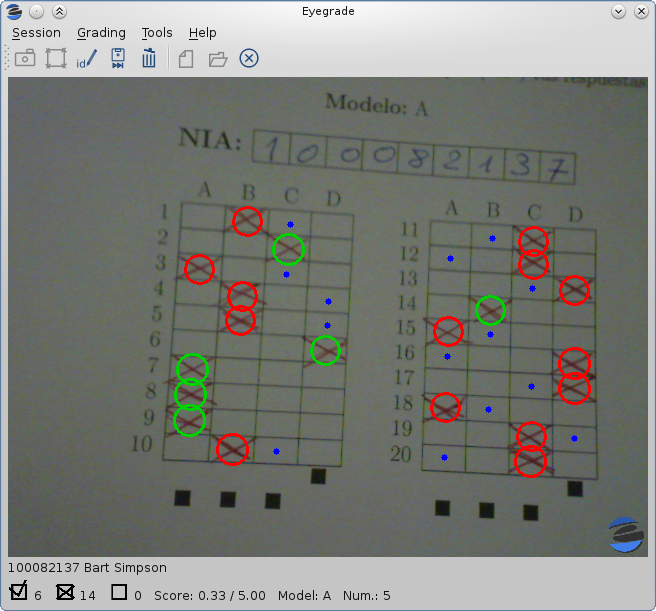
As you can see, the system shows:
- The answers of the student, with a green circle for correct answers and a red circle for the incorrect ones. When the student leaves a question unanswered, or provides a wrong answer for it, the correct answer for that question is marked with a small dot.
- The detected student id, at the bottom of the image, and his name (when the name is provided in the student list files).
- The total number of correct, incorrect and blank answers, at the bottom. The total score of the exam is also shown if the session is configured with the scores for the answers.
- The model of the exam. The model is detected from the small black squares that are printed below the answer table.
- The sequence number of this exam. It is incremented with each graded exam.
In this mode, you can perform the following actions (see the Grading menu):
- Modify the answers of the student, if there are mistakes in the automatically-detected answers, as explained in Modifying student answers.
- Modify the student id, if the system did not recognize it or recognized a wrong id, as explained in Modifying the student id.
- Continue to the next exam (shortcut 'Space-bar'): enters the grading mode in order to detect the next exam. Tip: before saving, it is better to remove the exam from the sight of the camera to avoid it from being captured again. You can even put the next exam under the camera before saving to speed up the process.
- Discard capture (shortcut 'Delete'): discards the current capture without saving it. It is useful, for example, when the capture is not good enough, or when you discover that the same exam has already been graded before.
- Manual detection of answer tables (shortcut 'm'): the system enters the manual detection mode, in which you can help the system detect the answer table by marking the corners of the answer tables. After that, the system will detect the answers of the student and automatically enter again the review mode. This command is allowed only when the system failed to recognize the geometry of the answer tables. See The manual detection mode.
2.8.1 Modifying student answers
The optical recognition system of Eyegrade may fail sometimes, due to its own limitations, or students filling their exams in messy ways. Sometimes, Eyegrade shows a cell in the answer table as marked when it is not, or a cell is not marked when it actually is. In addition, if Eyegrade thinks that two cells of the same question are marked, it will leave that question as blank.
You are able to fix those mistakes at the review mode. Click on a cell of the answer table to change an answer of the student that was not correctly detected by Eyegrade: when the student marked a given cell, but the system detected the question as blank, or simply showed other answer of that question as marked, just click on the cell the student actually marked. When the student left a question blank but the system did mark one of the cells as the answer, click on that cell to clear it. In both cases, Eyegrade will compute the scores again and immediately update the information on the screen.
2.8.2 Modifying the student id
Normally, you should provide Eyegrade with the list of class, because detection of student ids performs much better in that case. When scanning the id in an exam, Eyegrade sorts ids of the students in class according to the estimated probability of being the id in the exam. The one with the most probability is shown.
In the review mode, you can enter the correct student id when Eyegrade does not detect it, or detects a wrong one. When you select the Edit student id command in the Grading menu, a dialog for selecting the student id is shown:
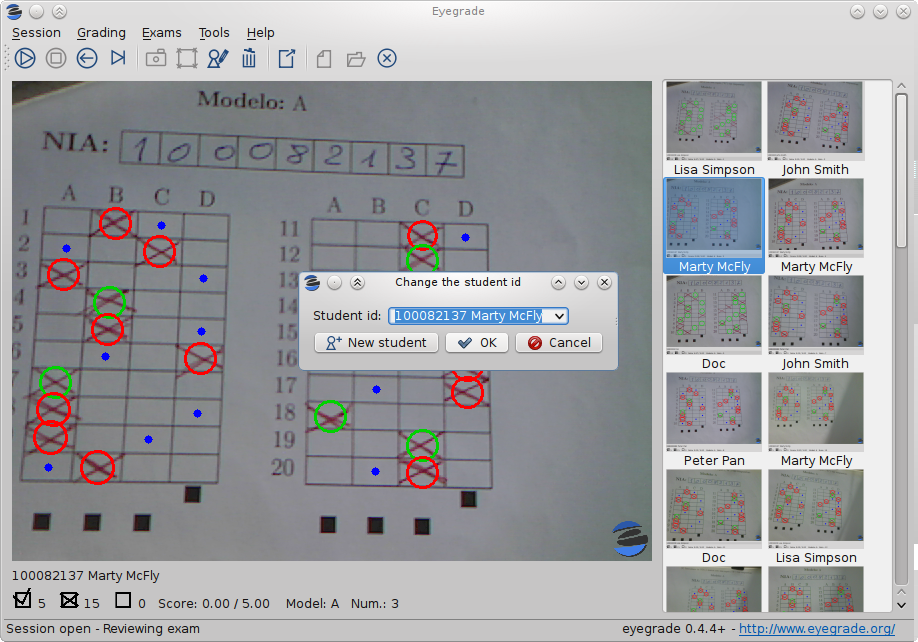
The dialog shows a drop-down menu with the students from the student list sorted by their probability (according to the OCR module) of being the student whose id is in the exam. You just choose any student in the list. In addition, you can filter students by writing part of their id number or their name.
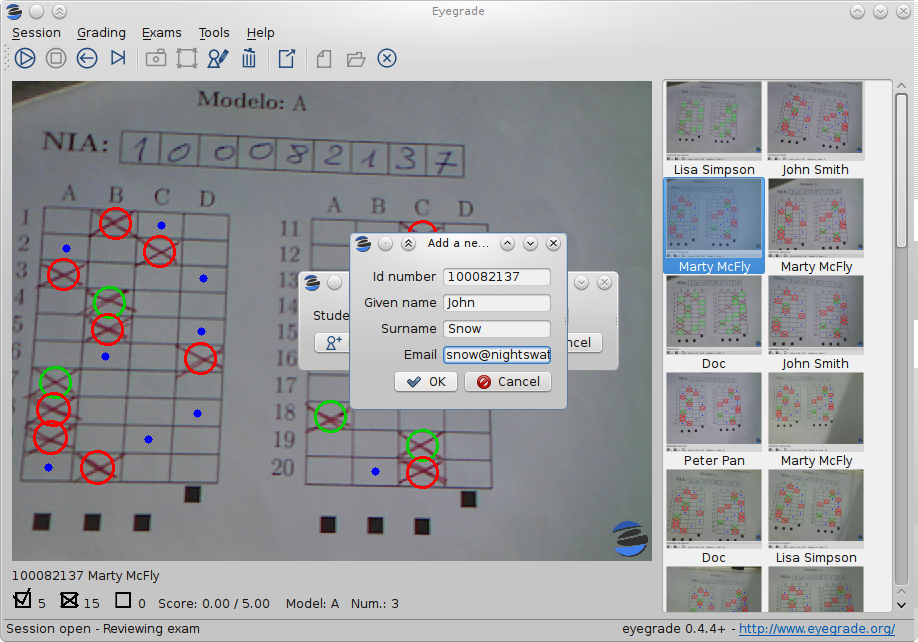
If the student is not in your list, you can also push the New student button to create a new student. It opens a dialog in which you can enter the data. The only mandatory field is this dialog is the student id number:
2.9 The manual detection mode
In some rare occasions, Eyegrade may not be able to detect the answer tables. In those cases, you can enter the manual detection mode from the grading mode (and also from the review mode if you entered that mode using the Capture the current image command). When entering the manual detection mode, the latest capture of the camera will be shown.
In this mode, just click with the cursor in the four corners of each answer table (a small circle will appear in every location you click). The order in which you click on the corners does not matter. After having done that, Eyegrade will infer the limits of each cell, and based on them it will read the answers of the student and the exam model. It will enter then the review mode.
The following two images show an example. In the first image, the user has selected six corners (notice the small blue circles):
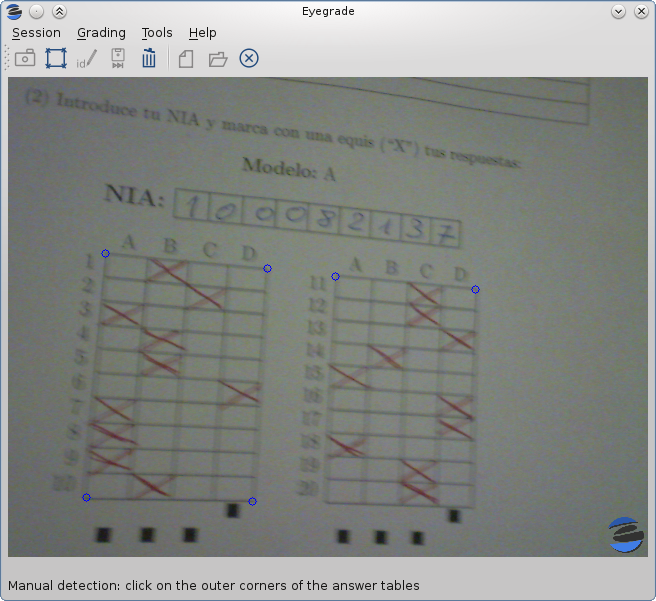
After she selects the remaining two corners, the system detects the answers and goes back to the review mode:
Note, however, that the student id will not be detected when you use this mode. When the system goes back to the review mode, set the id as explained in Modifying the student id.
At any point of the process, you can use the Manual detection of answer tables command (shortcut 'm') to reset the selection of corners and start again. If you think that the captured image is not good enough, you can also use the discard command (shortcut 'Backspace') to go again to the grading mode.
Tip: in the manual detection mode, make sure that the captured image shows all the answer tables as well as the exam model squares at the bottom.
3 Processing Student Grades
The easiest way to get the scores of your students once you've graded the exam is Exporting a listing of scores. You'll get a spreadsheet that you can open with Microsoft Excel, Libreoffice and other compatible spreadsheet software.
In addition, Eyegrade will produce some files within the session directory, including a snapshot of each graded exam. See Output within the session directory for more information.
3.1 Exporting a listing of scores
You will probably want to export your listing of scores in order to import it into the grade-book, spreadsheet, etc. you use. This can be done from the user interface (menu Exams / Export grades listing).
First, the program shows a dialog like the following one:

In this dialog you have to select:
- The format of the output file. You can choose between Office Open XML format (.XLSX files that can be opened from Microsoft Excel, LibreOffice and other compatible spreadsheet software) or a plain text file with tabulator-separated fields.
- The students to include in the listing: all the students in the student list or just the students whose exam has been graded in this session.
- The student groups to include in the listing: the grades for just a specific group of students or the grades for all the groups. This option is hidden if there is just one student group in the current session (see Student lists for more information about groups). If you want to all the groups into a .XLSX spreadsheet, you can also choose to place each group within a separate workbook of this spreadsheet.
- How the grades are sorted: according to the order in the student list you imported or according to the order in which you graded the exams.
- Which fields to include in the listing: student id number, student full name, student last name, student first name, grading sequence number, exam model letter, number of correct and incorrect answers, score and full list of answers. Only the fields you check are exported (as columns of the exported file). The order of these fields in the exported file is the same you see in the dialog (first the student id number, then her name, etc.). You can change column order later with your spreadsheet software if needed.
Once you complete the selection of options and press the OK button, a new dialog allows you to select the location and name with which the file will be saved. The proper filename extension (.xslx or .csv) is automatically set if you type a name without extension.
3.2 Output within the session directory
The output produced by Eyegrade within the session directory consists mainly of the following files:
- A file with the scores, named eyegrade-answers.csv: it contains one line for each graded exam. Each line contains, among other things, the student id number, the number of correct and incorrect answers, and the answer to every question in the exam. Student grades can be extracted from this file. The file with the scores is stored in the session directory. Eyegrade updates its contents when you close the session. Remember to close it before using this file.
- One snapshot of each graded exam, in PNG format: snapshots can be used as an evidence to show students. They can be shown to students coming to your office to review the exam, or even emailed to every student. The default name for those images is the concatenation of the student id and exam sequence number, in order to facilitate the instructor to locate the snapshot for a specific student. The captures are stored in the session directory, inside its captures subdirectory. The captures are saved when the exam is captured, and updated every time you edit the exam.
The file eyegrade-answers.csv produced by Eyegrade contains the scores in CSV format (with tabulator instead of comma as a separator), so that it can be easily imported from other programs such as spreadsheets. This is an example of such a file:
0   100999991       D       9       6       4.5     1/2/2/4/1/2/2/0/0/3/2/0/3/2/0/4/3/0/1/2
1   100999997       C       15      1       15.0    2/4/4/3/1/0/1/2/1/1/0/1/0/4/3/0/1/4/3/4
2   100800003       D       6       14      6.0     4/2/2/2/1/2/1/3/2/1/3/1/2/1/3/1/4/1/4/3
3   100777777       A       7       13      7.0     3/2/3/2/3/3/2/4/3/1/3/1/4/1/4/2/2/3/4/2
The columns of this file represent:
1.- The exam sequence number (the same number the user interface shows below the student id in the review mode).
2.- The student id (or '-1' if the student id is unknown).
3.- The exam model ('A', 'B', 'C', etc.)
4.- The number of correct answers.
5.- The number of incorrect answers.
6.- The score of the exam, if you configured the weight of correct and incorrect answers for this session.
7.- The response of the student to each question in the exam, from the first question in her model to the last. '0' means a blank answer. '1', '2', etc. mean the first choice, second choice, etc., in the order they were presented in her exam model.
Exams are in the same sequence they were graded. See Exporting a listing of scores to know how to produce a listing of scores with the columns and student order that best fits your needs.
4 Editing exams
Although you can use any software of your preference to typeset the exams, Eyegrade provides a module for doing that in combination with the LaTeX document preparation system.
The procedure consists of four steps, which are described in the next sections:
- Edit an XML file with the questions themselves.
- Edit a LaTeX template for your exam with your institution's look and feel, instructions to students, etc. This template is reusable for other exams in the future.
- Automatically generate the PDF files from the XML file and the LaTeX template.
The example files used in the following explanations are provided with Eyegrade inside its doc/sample-files directory (also accessible at GitHub).
This guide assumes that you have a LaTeX system installed. If you don't have it in your system, follow the instructions in Installing the LaTeX system.
4.1 Editing the questions of the exam
You need to typeset your questions in an XML document. You may use your favorite text editor for that.
At the beginning of the file you should provide some basic data about the exam, such as: the name of the course/subject, the name of the degree, the name of the exam, the date and the duration of the exam. You don't need to provide all those values, just the ones you want printed in the exam.
In addition, you can optionally configure there the scores to be awarded/detracted for correct/incorrect answers and configuration for student id detection. Got to Configuring student id detection and Configuring scores for more details about these two options.
Then, write the questions one by one. For each question, you have to provide:
- The statement of the question.
- An optional picture to be displayed with the question.
- An optional block of code (for programming exams and the like) to be formatted with a fixed-width font and preserving spacing.
- The text of the correct choice.
- The text of the incorrect choices.
The XML markup must be like shown in the following example:
<?xml version="1.0" encoding="UTF-8"?>

<exam xmlns="http://www.it.uc3m.es/jaf/eyegrade/ns/"
      xmlns:eye="http://www.it.uc3m.es/jaf/eyegrade/ns/">

  <subject>Computers and More</subject>
  <degree>An Awesome Degree</degree>
  <title>Final examination</title>
  <date>January 1st, 2011</date>
  <duration>10 min.</duration>
  <studentId eye:label="ID" eye:length="8" />
  <scores eye:maxScore="100" eye:penalize="false" />

  <question>
    <text>
      What is Python?
    </text>
    <choices>
      <correct>A programming language</correct>
      <incorrect>A computer manufacturer</incorrect>
      <incorrect>A kind of tree</incorrect>
      <incorrect eye:fix="last">None of the options above is correct.</incorrect>
    </choices>
  </question>

  <question>
    <text>
      What is a webcam?
    </text>
    <choices>
      <correct>A video camera whose output may be viewed in real
         time over a network, especially over the Internet.</correct>
      <incorrect>A video camera intended to spy on spiders</incorrect>
      <incorrect>A kind of fish</incorrect>
      <incorrect>Who knows!</incorrect>
    </choices>
  </question>

  <question>
    <text>
      What is the thing at the right?
    </text>
    <code eye:position="right" eye:width="0.4">for letter in ['a', 'b', 'c']:
    print letter</code>
    <choices>
      <correct>A computer program</correct>
      <incorrect>A recipe</incorrect>
      <incorrect>A tree</incorrect>
      <incorrect>Who knows!</incorrect>
    </choices>
  </question>

  <question>
    <text>
      Is the thing in the right a logo?
    </text>
    <figure eye:width="0.16" eye:position="right">sample-logo.pdf</figure>
    <choices>
      <correct>Well, it tries to be a logo, to be honest.</correct>
      <incorrect>No, it's a tree.</incorrect>
      <incorrect>No, it's a perfect square.</incorrect>
      <incorrect>Who knows!</incorrect>
    </choices>
  </question>

  <question>
    <text>
      Which is the capital of Spain?
    </text>
    <choices>
      <correct>Madrid.</correct>
      <incorrect>Barcelona.</incorrect>
      <incorrect>Paris.</incorrect>
      <incorrect>None of the other answers is correct.</incorrect>
    </choices>
  </question>

  <question>
    <text>
      Which is the capital of France?
    </text>
    <choices>
      <correct>Paris.</correct>
      <incorrect>Lion.</incorrect>
      <incorrect>Madrid.</incorrect>
      <incorrect>None of the other answers is correct.</incorrect>
    </choices>
  </question>

  <question>
    <text>
      What does ``hola'' mean in Spanish?
    </text>
    <choices>
      <correct>``Hello''.</correct>
      <incorrect>``Bye''.</incorrect>
      <incorrect>``Wave''.</incorrect>
      <incorrect>``Hola'' is not a word in Spanish.</incorrect>
    </choices>
  </question>

  <question>
    <text>
      How many months has a year?
    </text>
    <choices>
      <correct>12.</correct>
      <incorrect>6.</incorrect>
      <incorrect>10.</incorrect>
      <incorrect>It depends on whether it is a leap year or not.</incorrect>
    </choices>
  </question>

  <question>
    <text>
      Are dolphins mammals?
    </text>
    <choices>
      <correct>Yes.</correct>
      <incorrect>No.</incorrect>
      <incorrect>Sometimes.</incorrect>
      <incorrect>Who knows\ldots.</incorrect>
    </choices>
  </question>

  <question>
    <text>
      Who created Python?
    </text>
    <choices>
      <correct>Guido van Rossum.</correct>
      <incorrect>Richard Stallman.</incorrect>
      <incorrect>Dennis M. Ritchie.</incorrect>
      <incorrect>Jamie Zawinski.</incorrect>
    </choices>
  </question>

  <question>
    <text>
      How is ``Germany'' said in German?
    </text>
    <choices>
      <correct>Deutschland.</correct>
      <incorrect>Die Schweiz.</incorrect>
      <incorrect>Germany.</incorrect>
      <incorrect>Berlin.</incorrect>
    </choices>
  </question>

  <question>
    <text>
      What is Linux?
    </text>
    <choices>
      <correct>A free-software operating system.</correct>
      <incorrect>A river in Spain.</incorrect>
      <incorrect>The tallest mountain on Earth.</incorrect>
      <incorrect>An Internet company that sells phones.</incorrect>
    </choices>
  </question>

  <question>
    <text>
      Which of the following pieces of code follows the Java syntax?
    </text>
    <choices>
      <correct>
<code>public class MyClass {

}
</code>
      </correct>
      <incorrect>
<code>class MyClass:
    pass
</code>
      </incorrect>
      <incorrect>
<code>PUSHA
MOV eax, 60
</code>
      </incorrect>
      <incorrect>
<code>struct MyClass {

}
</code>
      </incorrect>
    </choices>
  </question>

<question>
    <text>
      Which of the following pictures is different to the rest?
    </text>
    <choices>
      <correct>
        <figure eye:width="0.03">drawing-1.pdf</figure>
      </correct>
      <incorrect>
        <figure eye:width="0.03">drawing-2.pdf</figure>
      </incorrect>
      <incorrect>
        <figure eye:width="0.03">drawing-2.pdf</figure>
      </incorrect>
      <incorrect>
        <figure eye:width="0.03">drawing-2.pdf</figure>
      </incorrect>
    </choices>
  </question>

</exam>
You can insert LaTeX markup within the text of the statement and the choices if you need, for example, to insert a math equation or format a piece of text in italics, boldface or typewriter font:
<question>
  <text>
    Text in \emph{italics}, \textbf{boldface}
    and \texttt{typewriter} font style.
  </text>
  <choices>
    <correct>A LaTeX equation: $x^2 - 1$</correct>
    <incorrect>Nothing</incorrect>
  </choices>
</question>
4.1.1 Inserting pictures
For inserting a picture in the statement of the question, you use the <figure> tag. Its file name must be provided within the <figure> and </figure> tags. It takes the following configuration attributes:
- eye:width: width of the picture relative to paragraph width (1.0 means the full width, 0.5 means half width, etc.) The picture will be scaled up or down accordingly. This attribute is mandatory.
- eye:position: position of the picture. Use center for placing it just below the statement of the question and above the choices. Use right for laying out the question in two columns: the statement of the question and the choices at the left and the picture at the right. The default value is center.
This is an example:
<question>
  <text>
    Is the thing in the right a logo?
  </text>
  <figure eye:width="0.16" eye:position="right">sample-logo.eps</figure>
  <choices>
    <correct>Well, it tries to be a logo, to be honest.</correct>
    <incorrect>No, it's a tree.</incorrect>
    <incorrect>No, it's a perfect square.</incorrect>
    <incorrect>Who knows!</incorrect>
  </choices>
</question>
Pictures can also be used inside a choice. It that case, the choice can only contain the picture and the eye:position attribute must not be used:
<correct>
  <figure eye:width="0.2">sample-logo.eps</figure>
</correct>
4.1.2 Inserting blocks of code
For inserting a block of code in the statement of the question, you use the <code> tag. The code itself is given within the <code> and </code> tags. White space and end-of-line characters are displayed as you provide them. It takes the following configuration attributes:
- eye:position: position of the block of code. Use center for placing it just below the statement of the question and above the choices. Use right for laying out the question in two columns: the statement of the question and the choices at the left and the piece of code at the right. The default value is center.
- eye:width: only if you select the two column layout (position right), provide the width of the right column relative to paragraph width (0.5 means half width, etc.) Remember to leave enough place for the left side. This attribute is mandatory for the right position and forbidden for the center position.
This is an example:
<code eye:position="right" eye:width="0.4">for letter in ['a', 'b', 'c']:
    print letter</code>
Blocks of code can also be used inside a choice. It that case, the choice can only contain the block of code and neither attribute can be used:
<incorrect>
<code>class MyClass:
    pass
</code>
</incorrect>
4.1.3 Configuring student id detection
If you want Eyegrade to detect student ids, you can provide a studentId element as shown in the example at Editing the questions of the exam. You just need to specify the length (number of digits) of student ids and the label that will be printed on the exam at the left of the box where students will write down their ids:
<studentId eye:label="ID" eye:length="8" />
If you provide a valid student id length, a student id box will automatically be inserted above the answer tables. Don't include the studentId element in your questions file if you don't want Eyegrade to detect student ids. The student id box won't appear in the exam in that case.
4.1.4 Configuring scores
You can optionally provide within the questions file the score to be awarded for correct answers and the score to be detracted for wrong answers by using the scores element, as shown in the example at Editing the questions of the exam. If you provide your scores here, they will automatically be saved into the exam configuration file. If you prefer not to, you'll still be able to enter scores later, when you create the grading session (see section Scores).
You have two ways to provide scores within the questions file. The first way consists in directly specifying those scores. For example, in order to awarding one point to correct answers:
<scores eye:correct="1" />
Scores can also be provided as fractional or decimal numbers:
<scores eye:correct="3/2" />
<scores eye:correct="1.5" />
By default, wrong answers don't detract points, but you can change this behavior. The following example penalizes wrong answers with half the score of a correct answer:
<scores eye:correct="1" eye:incorrect="1/2" />
For example, a student that got 8 correct answers and 2 incorrect answers would get 7 points (8 - 2 * 1/2).
You can alternatively let Eyegrade compute scores by specifying the maximum grade a student can get:
<scores eye:maxScore="100" />
In the example above, if there were 10 questions in your exam, Eyegrade would automatically assign 10 points to correct answers.
Wrong answers don't get a penalization in the example above. If you want a penalization so that the expected value for random answers is a score of 0, you can specify:
<scores eye:maxScore="100" eye:penalize="true" />
In the example above, in an exam with 10 questions with 3 choices each, wrong answers would get a penalization of 5 points. A student that answers randomly would be an average of 10/3 correct answers and 20/3 incorrect answers, for a final score of 10 * 10 / 3 - 5 * 20 / 3 = 0.
4.2 Editing the LaTeX template
In addition to the questions of the exam, you'll need a LaTeX template. It allows you to design the front page of the exam and other aspects (fonts, margins, etc.) This is an example:
\documentclass[a4paper,11pt]{article}

\usepackage{amssymb, amsmath}
\usepackage[utf8]{inputenc}
\usepackage{indentfirst}
\usepackage{multirow}

\usepackage[a4paper, margin=2.5cm, top=2cm, bottom=3cm]{geometry}

\pagestyle{empty}

{{declarations}}

\begin{document}

\begin{center}
\begin{tabular}{p{5.2cm}r}
\multirow{5}{*}[0.35cm]{\scalebox{0.18}{\includegraphics{sample-logo.pdf}}} &
\Large  \textbf{{{subject}}} \\
& \textbf{{{degree}}} \\
& \\
{{date}} & {{title}}. \\
Duration: {{duration}}
      & Score: 5 points out of 10 total points for the exam. \\

\end{tabular}
\end{center}

\vspace{0.5cm}

\emph{There is only one correct answer for each multiple choice
  question.  Score for correct answers:  {{score_correct}}.
  Penalty for wrong answers: {{score_incorrect}} points.}

\vspace{0.5cm}

\begin{center}
\begin{tabular}{|p{0.8\textwidth}|}
\hline
\begin{itemize}
\item Mark out your answers with an ``X''.
\item If more than one answer or no answer are selected, the question
  is considered to be not answered (no score is awarded, neither
  positive nor negative).
\item Remember to fill in your name and student ID.
\end{itemize}
\\
\hline
\end{tabular}
\end{center}

\vspace{0.2cm}

\begin{center}
(1) Write your personal data clearly.
\end{center}

\begin{center}
\large

\begin{tabular}{|l|p{12cm}|}
\hline
Last name:   &  \\
\hline
First name: &    \\
\hline
Group:   &  \\
\hline
\end{tabular}
\end{center}

\vspace{0.2cm}

\begin{center}
(2) Write down your student ID and cross out your answers with an ``X'':
\end{center}

\begin{center}
\large
\textbf{Model:} {{model}}
\end{center}

{{answer-table}}

\clearpage

{{questions}}

\end{document}
In the template, notice that there are some marks within {{ and }} that are intended to be replaced by the script with data from the exam:
- {{declarations}}: the script will put there some LaTeX declarations it needs.
- {{subject}}, {{degree}}: name of the subject and degree it belongs to. Taken from the XML file with the questions.
- {{title}}: the title of the exam. Taken from the XML file with the questions.
- {{duration}}: duration of the exam. Taken from the XML file with the questions.
- {{model}}: a letter representing the model of the exam. Each model has a different ordering for questions and choices within questions.
- {{answer-table}}: replaced by the table in which students mark out their answers.
- {{questions}}: replaced by the questions of the exam.
- {{variation}}: the exam variation selected for this exam. Its value is "0" if no variation has been selected, or "1", "2", etc. if a variation has been selected.
Note that a template is highly reusable for different exams and subjects.
4.3 Creating the PDF files
Once the exam file and the template have been created, the eyegrade-create program parses them and generates the exam in PDF format, provided that LaTeX is installed and available in your system's PATH (see Installing the LaTeX system).
You'll use the eyegrade-create.exe (just eyegrade-create on Linux) binary file. The only way to run eyegrade-create by now is from a command-prompt console. If you are on Windows, you'll need to provide its full location in the console:
"C:\Program File (x86)\eyegrade\app\eyegrade-create" --version
Don't forget to add the double quotation marks because of the white spaces within its path. Alternatively, you may add the C:\Program Files (x86)\eyegrade\app to your system's PATH (see, for example, this guide about changing the PATH variable in Windows 10). If you do that, you won't need to enter the full path of the program:
eyegrade-create --version
On Linux, just run eyegrade-create from a console, because with the two suggested installation methods the program will be in your shell's PATH variable:
eyegrade-create --version
Once you are able to run eyegrade-create, let's see how to create the PDF files of your exams. Run the following command from a command-line console (remember to change it to the full path if you are in Windows and it isn't in your PATH):
eyegrade-create -e exam-questions.xml -m 0AB template.tex -o exam
It will create models 0, A and B of the exam with names exam-0.pdf, exam-A.pdf and exam-B.pdf. The exam model 0 is a special exam in which questions are not reordered. The correct answer is always the first choice in the model 0. The model 0 is convenient while editing the questions, but you must remember not to use it in the exam itself.
In addition, Eyegrade will automatically create the exam.eye file needed to grade the exams, or update it if it already exists.
If Eyegrade encounters an error in the process, you'll see the reason of the error in one of the following two ways:
- If the error is in the XML syntax of the file with the questions, you'll get the error message and line of the XML file in which it was encountered.
- If the error is in your LaTeX template or in the LaTeX markup of your questions, you'll get the output of the LaTeX command, which will tell the line in which it happened relative to the temporary LaTeX file Eyegrade has created (e.g. exam-0.tex). Eyegrade will leave this file, as well as the full transcript of the error (e.g. exam-0.log) in the same directory in which the output would be produced in order to help you locate the reason of the error.
The script create_exam.py has other features, like creating just the front page of the exam (no questions needed). They can be explored with the command-line help of the program:
eyegrade-create -h
The answer table can be enlarged or reduced with respect to its default size, using the -S option and passing a scale factor (between 0.1 and 1.0 to reduce it, or greater than 1.0 to enlarge it). The following command enlarges the default size in a 50% (factor 1.5):
eyegrade-create -e exam-questions.xml -m A template.tex -o exam -S 1.5
4.4 Installing the LaTeX system
LaTeX is included in the repositories of the major Linux distributions. In Debian and Ubuntu you can simply install the package texlive-latex-recommended:
sudo apt-get install texlive-latex-recommended
For MS Windows there are some LaTeX distributions that provide a graphical installer, such as ProText:
- Download the ProText installer (be aware that the size of the download is over 3 GB).
- From the installer, choose to install MiKTex. When you are offered a minimal or full installation, the minimal one is enough.
- You probably won't need to install TeXstudio, which is also offered by the installer.
4.5 Advanced exam editing
4.5.1 Fixing the position of a choice
Choices can be prevented from being randomly ordered with the eye:fix attribute, which can take the values "first" (to fix a choice as the first one) and "last" (to fix a choice as the last one). For example:
<question>
  <text>
    What is Python?
  </text>
  <choices>
    <correct>A programming language</correct>
    <incorrect>A computer manufacturer</incorrect>
    <incorrect>A kind of tree</incorrect>
    <incorrect eye:fix="last">None of the options above is correct.</incorrect>
  </choices>
</question>
If more than one choice are fixed first or last, the choices fixed first will appear at the beginning, in the same order they are declared in the XML file, and the choices fixed last will appear at the end, also in the same order they are declared in the XML file.
4.5.2 Question groups
Starting from Eyegrade 0.9, you can group interdependent questions. Grouped questions will be shown always in the same order you defined them. That is, they won't be shuffled within their group, but the group itself will be shuffled with respect to other single questions and groups in the exam.
In addition, groups allow you to define, optionally, a piece of text and a figure or a piece of code, which will be shown before the first question of the group. They are intended to show common information that applies to all the questions of the group.
A question group is defined in your XML document by using the <group> tag where you would normally place just single questions. The questions that compose that group are defined in the usual way with <question> tags inside the <group> tag. The following example shows how to define a group:
<?xml version="1.0" encoding="UTF-8"?>

<exam xmlns="http://www.it.uc3m.es/jaf/eyegrade/ns/"
      xmlns:eye="http://www.it.uc3m.es/jaf/eyegrade/ns/">

  <subject>Set theory</subject>
  (...)
  <group>
    <common>
      <text>
        Given the set $A = \{a, b, c, d\}$:
      </text>
    </common>
    <question>
      <text>
        What's the cardinality of $A$?
      </text>
      <choices>
        <correct>4</correct>
        <incorrect>3</incorrect>
        <incorrect>$\infty$</incorrect>
      </choices>
    </question>

    <question>
      <text>
        What's the intersection of $A$ with $\{d, f, a\}$?
      </text>
      <choices>
        <correct>$\{a, d\}$</correct>
        <incorrect>$\{a, b, c, d, f\}$</incorrect>
        <incorrect>$\{b, c\}$</incorrect>
      </choices>
    </question>

    <question>
      <text>
        And the union of $A$ with $\{d, f, a\}$?
      </text>
      <choices>
        <correct>$\{a, b, c, d, f\}$</correct>
        <incorrect>$\{a, d\}$</incorrect>
        <incorrect>$\{a, b, c, d, d, f, a\}$</incorrect>
      </choices>
    </question>
  </group>

  <question>
    <text>
      The powerset of a set $A$ is:
    </text>
    <choices>
      <correct>
        The set whose elements are all the possible subsets of $A$.
      </correct>
      <incorrect>
        The cartesian product $A \times A$.
      </incorrect>
      <incorrect>
        The set $A \cup A$.
      </incorrect>
    </choices>
  </question>

  (...)
</exam>
In the example above, the first three questions will always appear in exactly that order. The fourth question, and other questions or groups you define, would be shuffled and appear before or after these three questions. A visual hint that these questions form a group will also be shown, so that students know where groups begin and end. Additionally, as you can see in the example above, you can set an optional common section for a question group, in which you can insert text, code or a picture the same way you would do in the statement of a normal question. They will be displayed in the exam before the first question of the exam.
4.5.3 Questions with variations
Sometimes you may want slightly different variations of the same question to appear in different models of the exam. For example, a question that asks the student to solve a linear equation could be defined with two variations, each one with a slightly different equation to solve.
There are two ways of defining question variations. The first one consists in writing the different variations as full questions, like shown below:
<question>
  <variation>
    <text>
      Given the set $A = \{a, b, c, d\}$,
      what's its cardinality?
    </text>
    <choices>
      <correct>4</correct>
      <incorrect>3</incorrect>
      <incorrect>$\infty$</incorrect>
    </choices>
  </variation>
  <variation>
    <text>
      Given the set $A = \{x, y, z\}$,
      what's its cardinality?
    </text>
    <choices>
      <correct>3</correct>
      <incorrect>4</incorrect>
      <incorrect>$\infty$</incorrect>
    </choices>
  </variation>
</question>
The second one consists in writing a question template based on some parameters, and defining different values for those parameters in each variation:
<question>
  <variation_params>
    <variation>
      <param eye:name="setA">\{a, b, c, d\}</param>
      <param eye:name="correct">$\{a, d\}$</param>
      <param eye:name="incorrect1">$\{a, b, c, d, f\}$</param>
      <param eye:name="incorrect2">$\{f\}$</param>
    </variation>
    <variation>
      <param eye:name="setA">\{b, d, e, f\}</param>
      <param eye:name="correct">$\{d, f\}$</param>
      <param eye:name="incorrect1">$\{a, b, d, e, f\}$</param>
      <param eye:name="incorrect2">$\{a\}$</param>
    </variation>
  </variation_params>
  <text>
    What's the intersection of {{setA}} with $\{d, f, a\}$?
  </text>
  <choices>
    <correct>{{correct}}</correct>
    <incorrect>{{incorrect1}}</incorrect>
    <incorrect>{{incorrect2}}</incorrect>
  </choices>
</question>
When a model of the exam is shuffled, a variation will be randomly and independently chosen for every question containing variations. This is the default behavior of the eyegrade-create command.
Note that questions contained within groups are an exception: as explained below, the same variation will be chosen for all the questions in the same group. However, different variations might be chosen for questions in different groups of the same exam model.
Alternatively to letting the system choose variations randomly, you can force a given variation number to be chosen for all the questions and groups in a given model. For example, the commands below choose the first variation of every question for models A and B, and the second variation for models C and D:
eyegrade-create -e exam-questions.xml -m AB template.tex -o exam --variation=1
eyegrade-create -e exam-questions.xml -m CD template.tex -o exam --variation=2
If you use the --variation argument to choose a variation number, all the questions with variations are expected to contain at least that number of variations. For example, if you set --variation=3 to choose the third variation, all the questions must either no variations or at least three variations.
4.5.4 Question groups with variations
If your questions belong to a group, you either define separate questions, each one defining its own variations, or define parameters at the group level, and use them through the questions of that group:
<group>
  <variation_params>
    <variation>
      <param eye:name="equation">$2x + 3 = 7$</param>
      <param eye:name="x">2</param>
      <param eye:name="xIncorrect1">-2</param>
      <param eye:name="xIncorrect2">0</param>
      <param eye:name="equiv1">$2x - 4 = 0$</param>
      <param eye:name="equiv2">$x + 3 = 3$</param>
      <param eye:name="equiv3">$2x + 10 = 0$</param>
    </variation>
    <variation>
      <param eye:name="equation">$3x + 2 = 11$</param>
      <param eye:name="x">3</param>
      <param eye:name="xIncorrect1">-3</param>
      <param eye:name="xIncorrect2">0</param>
      <param eye:name="equiv1">$3x - 9 = 0$</param>
      <param eye:name="equiv2">$x + 2 = 2$</param>
      <param eye:name="equiv3">$3x + 13 = 0$</param>
    </variation>
  </variation_params>
  <common>
    <text>
      Consider the equation {{equation}}:
    </text>
  </common>
  <question>
    <text>
      What's the solution to the equation?
    </text>
    <choices>
      <correct>$x={{x}}$</correct>
      <incorrect>$x={{xIncorrect1}}$</incorrect>
      <incorrect>$x={{xIncorrect2}}$</incorrect>
    </choices>
  </question>
  <question>
    <text>
      The equation is equivalent to:
    </text>
    <choices>
      <correct>{{equiv1}}</correct>
      <incorrect>{{equiv2}}</incorrect>
      <incorrect>{{equiv3}}</incorrect>
    </choices>
  </question>
</group>
Note that, for a given exam model, the same variation will be chosen for all the questions in the group. Because of that, all the questions belonging to the same group must contain either no variations or the same number of variations. For example, the group defined above contains questions with two variations. If you add more questions to the group, they must contain two variations or no variation at all.
5 Advanced features
5.1 Preserving the order of some questions when shuffling
(New in Eyegrade 0.9)
When you use eyegrade-create to typeset an exam, all the questions of the exam get shuffled by default. However, you might want sometimes to keep the order of some questions that are related and form a logical sequence. In order to do that, just wrap those related questions with a group element in the XML file that defines the questions, such as in the following example:
<?xml version="1.0" encoding="UTF-8"?>

<exam xmlns="http://www.it.uc3m.es/jaf/eyegrade/ns/"
      xmlns:eye="http://www.it.uc3m.es/jaf/eyegrade/ns/">

  <subject>Set theory</subject>
  <degree>Mathematics</degree>
  <title>Final examination</title>
  <date>January 1st, 2020</date>
  <duration>10 min.</duration>
  <studentId eye:label="ID" eye:length="8" />
  <scores eye:maxScore="100" eye:penalize="false" />

  <group>
    <common>
      <text>
        Given the set $A = \{a, b, c, d\}$:
      </text>
    </common>
    <question>
      <!-- Q1 -->
      <text>
        What's the cardinality of $A$?
      </text>
      <choices>
        <correct>4</correct>
        <incorrect>3</incorrect>
        <incorrect>$\infty$</incorrect>
      </choices>
    </question>

    <question>
      <!-- Q2 -->
      <text>
        What's the intersection of $A$ with $\{d, f, a\}$?
      </text>
      <choices>
        <correct>$\{a, d\}$</correct>
        <incorrect>$\{a, b, c, d, f\}$</incorrect>
        <incorrect>$\{b, c\}$</incorrect>
      </choices>
    </question>

    <question>
      <!-- Q3 -->
      <text>
        And the union of $A$ with $\{d, f, a\}$?
      </text>
      <choices>
        <correct>$\{a, b, c, d, f\}$</correct>
        <incorrect>$\{a, d\}$</incorrect>
        <incorrect>$\{a, b, c, d, d, f, a\}$</incorrect>
      </choices>
    </question>
  </group>

  <question>
    <!-- Q4 -->
    <text>
      The powerset of a set $A$ is:
    </text>
    <choices>
      <correct>
        The set whose elements are all the possible subsets of $A$.
      </correct>
      <incorrect>
        The cartesian product $A \times A$.
      </incorrect>
      <incorrect>
        The set $A \cup A$.
      </incorrect>
    </choices>
  </question>

  <question>
    <!-- Q5 -->
    <text>
      The set of all natural numbers is often denoted with:
    </text>
    <choices>
      <correct>
        $\mathbb{N}$
      </correct>
      <incorrect>
        $\mathbb{R}$
      </incorrect>
      <incorrect>
        $\mathbb{Z}$
      </incorrect>
    </choices>
  </question>

  <group>
    <question>
      <!-- Q6 -->
      <text>
        The symbol $\emptyset$ represents:
      </text>
      <choices>
        <correct>
          The empty set.
        </correct>
        <incorrect>
          Any set with infinite elements.
        </incorrect>
        <incorrect>
          The set of all the possible finite sets.
        </incorrect>
      </choices>
    </question>

    <question>
      <!-- Q7 -->
      <text>
        And its cardinality is:
      </text>
      <choices>
        <correct>
          Zero.
        </correct>
        <incorrect>
          Infinite.
        </incorrect>
        <incorrect>
          Undefined.
        </incorrect>
      </choices>
    </question>
  </group>
</exam>
Every time the questions in the previous example get shuffled, the first three questions (Q1, Q2 and Q3) will be treated as a group, and their internal order will be preserved. That is, Q1, Q2 and Q3 will appear always together and in this order. The same will happen with the last two questions (Q6, Q7). Some possible orderings will be:
- Q4, Q1, Q2, Q3, Q5, Q6, Q7
- Q6, Q7, Q1, Q2, Q3, Q5, Q4
- Q5, Q4, Q6, Q7, Q1, Q2, Q3
5.2 Creating the exams in a word processor
The current prototype of Eyegrade require users to know LaTex in order to personalize exam templates. This section explains an alternative way to create exams compatible with Eyegrade in a word processor such as Microsoft Word. If you create your own exams with a word processor, you'll need also to enter the exam configuration when you create a new grading session. See Manual configuration of the exam if you want to enter the values through the user interface of Eyegrade or Manually editing the .eye file if you prefer to use a text editor.
The objective is emulating the tables that Eyegrade creates so that the program can read them. This is an example:
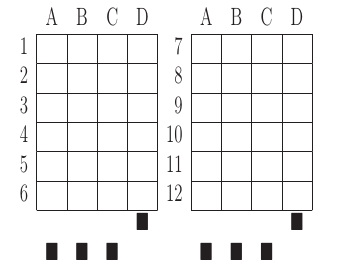
You can use as a template this example MS Word document. It shows an answer table for 20 questions, which you can edit in order to customize if for your needs. Nevertheless, you should read the rest of this section if you are planning to customize the answer table.
An answer table is a table in which rows represent the questions and columns represent the choices. There can be more than one answer table, but they have to be side by side (they cannot be placed one above the other). The example above show two answer tables. A few restrictions have to be taken into account:
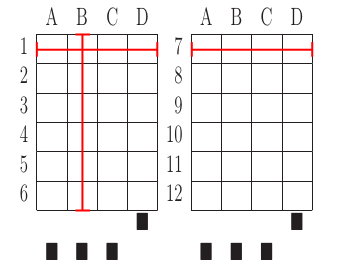
- If there are more than one table, they must be horizontally aligned. That is, their top and bottom must be in the same line, and their rows must have exactly the same height (see the example above).
- All the rows should have the same height.
- In order to improve the detection process, the length of the vertical lines and the length of the horizontal lines should be more or less proportionate (e.g. one of them should not be more than a 30% larger than the other). If there are more than one answer table, consider the added length of the horizontal lines of every table. The following image illustrates this. The red vertical line is not much smaller than the sum of the two horizontal lines.
- If an answer table has less rows than the others, it is better to keep the horizontal lines, as shown in the image below:
The boxes for the student ID number should be above the answer tables, not too close but not too far away either (see the example below). The width of the student ID table should be comparable to the sum of the width of the answer tables (approximately no less than 2/3 of that sum, and no more than 3/2). Student IDs with just a few digits (two, three, four) can potentially be problematic for wide answer tables.
At the bottom of the answer boxes there must be some black squares. They encode the exam model (permutation). In addition, they help the system to know whether the detection of the answer tables was correct.
Imagine that there are two more rows at the end of each answer table, with the same height as the other rows. Squares will be either in the one above or in the one below, and there must be a square per column. Squares should be centered in those imaginary cells. The position (above/below) of a square conveys the information read by Eyegrade as binary information.
The exam model is encoded with three squares. Therefore, there can be eight different models. The fourth square is a redundancy code for the previous three squares. This 4-square pattern is repeated from left to right as long as there are columns. The table to which a column belongs is not taken into account. For example, if there are two answer tables with three columns each, the fourth square (the redundancy square) is placed at the first column of the second table. The other two columns of the second answer table would contain the same squares as the first two columns of the first table.
The following table show the 4-square pattern for each exam model, as they should be placed from left to right:
| Model | ||||
| A | Down | Down | Down | Up |
| B | Up | Down | Down | Down |
| C | Down | Up | Down | Down |
| D | Up | Up | Down | Up |
| E | Down | Down | Up | Down |
| F | Up | Down | Up | Up |
| G | Down | Up | Up | Up |
| H | Up | Up | Up | Down |
5.3 Manually editing the .eye file
The files that store the configuration of an exam and the correct answer for each question are stored with a .eye extension. An example is shown below:
[exam]
dimensions: 4,7;4,7
id-num-digits: 8
correct-weight: 50/7
incorrect-weight: 0
blank-weight: 0

[solutions]
model-A: 1/1/3/2/2/3/3/4/4/3/4/3/1/4

[permutations]
permutations-A: 2{1,4,3,2}/3{1,3,4,2}/14{3,4,1,2}/8{3,1,2,4}/4{2,1,4,3}/1{3,2,1,4}/13{4,3,1,2}/10{4,3,2,1}/7{4,2,3,1}/6{3,2,1,4}/12{3,2,4,1}/9{2,3,1,4}/5{1,2,4,3}/11{3,4,2,1}

[variations]
variations-A: 0/0/0/0/0/0/0/0/0/0/0/0/0/0
The file is just plain text and can be edited with any text editor. It has several sections: exam, solutions and permutations.
The fields of the exam section are:
- dimensions: here the number of answer tables and the number of columns and rows in each answer table are configured. For example, "4,6;4,6" means that there are two answer tables, both of them with geometry "4,6". The "4" is the number of columns of the table. The "6" is the number of rows. Tables are specified from left to right (i.e. the first table geometry corresponds to the left-most table in the exam).
- id-num-digits: number of cells of the table for the student id number. Putting a 0 here means that the id number needs not to be read.
- correct-weight: a number, such as 1.75, that represents the score assigned to a correct answer.
- incorrect-weight: a number that represents the score to be substracted for failed answers. Blank answers are not affected by this.
The fields correct-weight and incorrect-weight are optional. If they appear in the file, the program will show the total score in the user interface.
The solutions section specifies the correct answers for each model (permutation) of the exam. Models are identified by letters ("A", "B", etc.). For example:
model-A: 4/1/2/1/1/1/2/4/1/2/3/1
model-B: 3/2/1/4/4/2/2/1/4/2/3/3
In the example above, in the model A, the correct answer for the first question is the 4th choice, for the second question is the 1st choice, for the third question is the 2nd choice, etc.
The permutations section has information that allows to know how questions and choices have been shuffled with respect to the original order. They are used only for extracting statistics or fixing grades after the exam if the solutions used for grading are found to have an error in some questions. If you create the .eye manually, you probably want to just remove this section from the file, unless you need some of the above-mentioned functions.
5.4 Automatic detection of exam removal
If the camera in your setup is fixed, that is, you place an exam below the camera, review it, remove it and place the next exam, you may want Eyegrade to detect that you have removed the exam instead of having to click on the Save and capture next exam command.
You can activate this experimental feature in the Tools menu, Experimental submenu, option Continue on exam removal. When this option is checked, Eyegrade saves the current capture and enters the search mode automatically, after a few seconds of not detecting an exam. Before placing the new exam, wait for the system to actually enter the search mode: if you are too quick, Eyegrade might not detect the removal of the exam.
Tip: don't use this option if the camera is not fixed, because just moving it a little bit may cause Eyegrade to think that the exam has been removed.